Showing posts with label Home activities. Show all posts

Thursday, April 1, 2010

A recycle robot


I am in the habit of collecting boxes and tubes for some future art project! So we put them to good use building a recycle robot!

I gave Henry all the things he could use on a table. Boxes, toilet rolls, paper plates and a flower pot and some wool and googly eyes! and asked him to design his robot.

Just be aware to have some very strong glue handy if you are going to stick tubes on as legs and arms.

We covered the cereal box body with plain paper so Henry could create whatever design on it he wanted. Henry asked me to help with the arms and legs, but after that he added everything else inc. hair and eyes.

In the end Henry gave the robot a name - "Stanley" and stuck some packing polystyrene bits to its tummy.

Stanley still stands proud in Henry's bedroom, even though we completed this activity months ago.


Tuesday, January 26, 2010

Creating with shapes

With one of Henry's friends coming over to play, I decided to create a little project to keep them both occupied for 10 minutes!

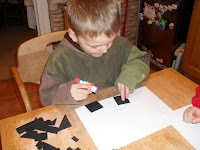
You will need some light weight card or paper of any colour. I had black already, so used this. Next, cut the card into shapes of any type. I tried to cut at least two of everything, so if Henry wanted to he could create a symmetrical piece of art.

You can make the shapes as large or as small as you want. I stuck with squares, rectangles and triangles, but circles and stars would be great too. I supplied a couple of googly eyes as well just for an interesting twist!
Provide your child with the shapes, any little extras such as the googly eyes or stickers, a blank piece of paper and a glue stick and suggest they create.......anything!

Henry started out by creating two trees in pots (symmetrical), using squares for the pots, long rectangles for the trunks and triangles for the tree tops. Then found the googly eyes and got creating a monster! It was great, because as he added shapes he told me what he was doing, its interesting to be in on the thought processes
some times!

We labelled the creation and attached it to the fridge........something so simple, kept two 5 year old boys occupied for about 20 minutes!

Name alien!

I found this great idea on another blog today by Allison McDonald. So simple, but a great idea.

First provide your child with a piece of paper (any colour goes), then ask them to fold in half long ways. This on its own is easier for some children than others.

Next, ask your child to write their name across the width of the paper. Try & encourage writing down to the fold. That way, the resulting alien
shape will be more fun to work with. Big letters are a lot of fun and actually quite challenging when kids have started to write small for school purposes.
When the name is written, draw a line roughly around each
letter so that your child has a guide to follow when they are cutting. Then off they go with the scissors. It really does not matter how neat the cutting is.

Next stage is to open out the paper & turn it over to the blank side....this is where the creating comes in. Supply your child with whatever you think they would like to embellish their alien with! Googly eyes, paints, glitter, feather, pipe cleaners, stickers...whatever works.

Henry had fun with this and requested 6 eyes for his alien...then added some hands, feet and general glittering!


Tuesday, January 19, 2010

The most wonderful egg in the world - Book

During our day of hen themed activities we read "The most wonderful egg in the world" written and illustrated by Helme Heine.

This is a story of three hens who want to become princesses. The king suggests that whoever lays the most wonderful egg will be crowned princess. The first lays a perfect egg, the second a huge egg
and the third....a colourful cube shaped egg! The king can not decide,
because they are all wonderful in their own way....and all the hens become princesses!

We have read this book so many time, so Henry knows the story off by heart. However we read it again, and then I suggested that Henry, Kevin and I all went to a different table and drew what we considered to be the most wonderful egg in the world.

Kevin got out the scissors and created an egg mobile! I created a colourful Easter egg. Henry got to work with his favourite colour - red and drew a rectangle red egg! Then labelled it.

We discussed how he would describe his egg - rectangle, red, sharp edges. He then described my egg in various ways.....even I was at a loss how to describe daddy's egg!

Monday, January 18, 2010

Henry does Hens!


At Christmas we became the proud owners of two brown hens - Henry took delivery of them on Xmas day from Santa! Named Henrietta and Peck Peck, they have become integral members of our family! As I write this blog however, I am recovering from finding one of said hens in the middle of the road near our house after she decided a re enactment of "chicken run" would be fun! Luckily I found her, caught her & delivered her back safely!

With a number of snow days in the last couple of weeks, I dedicated one day to lots
of activities with a "
hen" theme. I'll try & outline them all here, but in summary we had:
  1. Create a piece of hen related art (painting, collage, drawing etc)
  2. Words rhyming with "egg" and "hen" - thought of and written down by Henry.
  3. Read some hen related stories (see another post).
  4. Sight words bingo (with an egg theme)
  5. Simple addition of how many eggs have the two hens layed!
  6. Provide an egg shape and suggest that it be turned into a person/animal etc.
  7. Create a story about Henry and his hens in simple words and read it.
I apologise for the long post, but we did quite a few activities!

1. Hen art
Henry's piece of hen art was a collage using tissue paper cut up and scrunched up. I drew the outline of the Hen, and provided the
squares of cut tissue paper. I did originally offer this in gold, orange and yellow, thinking Henry would use all colours for a multi coloured hen.....however he
stuck with gold and I cut adequate bits for him to finish in that colour. Peck Peck the collage hen was a great success!

2. Rhyming words
On the internet you can find images of
anything you want. A search for "eggs" brought me a great egg picture which I replicated loads of
times. For the rhyming words, Henry had the egg shapes to write each letter on to create the rhyming words.

3. Hen & egg stories
We have on our shelf - Coriander the contrary hen and The most wonderful egg in the world, which we read. We also did an activity with the latter title which I will post as a separate activity.

4. Simple words egg bingo
For Egg bingo I printed a page with 8 eggs on, and onto each of these eggs I wrote one of Henry's sight words. I then printed out a further 8 eggs that I cut out and wrote the same words on. I replicated each of these so I could play with Henry. We took it in turns to take eggs off the pile and read the words then cover the eggs. It was a bit more fun that simple squares with words in.

5.Egg addition eggsercise!
I found a picture of a hen on the internet & printed it out twice. I then printed about 10 eggs out. Under each hen I placed a number of eggs and we did simple addition with Henry recording the number of eggs layed next to a picture of his hen run.


6. Egg head
I provided Henry with a blank piece of paper and a cut out of an egg, and suggested he turn it into a face. I imagined he would add some hair, eyes, nose and mouth......I was wrong - he actually turned it into an egg person! Then when asked to name it...called it Henry Egg!


7. A story about Henry and his hens
This I prepared in advance. I created simple sentences that Henry knew the words or could sound out the words with some help. I then added a few images to help with the story recognition. Henry thought this was great, that he appeared in the story with his hens!

Wednesday, January 13, 2010

Name that sign!


This little project was a bit of fun, though it made me realise how much Henry actually knew about signs!

First I used by creativity to draw a few signs, and Henry identified each....amazingly he knew them all (not helped by my artistic skills)!


Then I asked Henry to draw me a sign warning about anything he wanted.....he came up with a tree across the road, which he drew and labelled for me.

I then suggested he did another. Very into his hens and the moment, he created a sign to warn that one of his hens was about - I might just have to stick that one to the back door to remind me!
This occupied us for about 15 minutes, but got him involved in being creative and imaginative, writing, sounding his letters and discussion.

Smarties maths

Ever looking for hands on ways to make maths fun, Henry has just found that working with chocolate smarties is GREAT! We did a few things within this little project.

1. We estimated by looking in the bowl of smarties, which colour would have the most smarties, and drew the colours along the bottom of the chart in the order we though before we started graphing.
2. Henry picked out each colour and sorted the right
smarties out of the bowl, then lined them up on the graph to create a smarties bar graph.

3. Henry then counted the number of smarties of each colour and recorded this on another piece of paper.

4. The favourite bit I think for Henry was then eating all the smarties!

5. Lastly I got Henry to draw the smarties on the graph according to the numbers he recorded.

We were at this for about 50 minutes! Never once did Henry wander off!...I think it was the promise of the smarties!

Tuesday, September 29, 2009

Making letters fun!!!! - Flour.

Henry has started learning his letters at school, and we have been asked to support his learning for a few minutes each day, to help establish the letter sounds.

I'm not going to do a blog entry for every letter, just when we try something new that could be used for any of the letters.

With Henry; the hands on touchy feely approach is best. So i got out a wooden board, spread flour on it, then suggested Henry try writing the letters with his fingers in the flour.

The first time we do any letter i write it with him; i stand to his left and we write at the same time, so he can get the formation of the letter correctly. Using the flour, i then put dots where he can start his letters and let him roll with it. For the letter "t: he got very enthusiastic and i think we managed 7 of the letter "t". Henry loves to use the rolling pin to roll the flour flat and start again.

Painting without paint or a brush!!!


Outdoor Hour - Challenge #3 - Time to draw

For Henry, who doesn't go a bundle on doing art work, i try to steer away from plain drawing or painting, trying to make the experience a little more unusual if possible.

Most days we get out for a walk with our dog. So for yesterday's walk i took a bag to collect all kinds of things from nature that we might be able to use for an art project.

Henry got very into putting things into the bag...so much so we had an overflowing bag by our return home! During our walk i asked Henry to think of what we could use to draw or paint with, with some help he suggested sticks and feathers. I picked some blackberries and elderberries and got Henry to guess what we might use these for, he was very intrigued by the idea of making paint from them......even more so wh
en i told him we would paint with mud when we got home!

Back home i put all our findings out on a piece of paper and provided a fairly absorbent type of paper for Henry to create his art work on.

To start with i suggested Henry try painting with
mud, He chose a stick and created brown lines all over his page.

Next Henry tried out squashing black berries then rolling them with a stick....beautiful purple designs started to develop. Amazingly, every blackberry had a slightly different colour! Elderberries were squashed and rolled, and finally back to the mud with a rose hip and a feather to create some more brown patterns.

I was totally amazed how well this idea worked. After a good hand wash, the very unusual piece of art has pride of place on our fridge! - whoever said you needed paint and a paintbrush to create a masterpiece!!!

Sunday, August 9, 2009

Henry paints his bedroom!


This weekend we returned to our house in the UK to do a spot of decorating - namely Henry's bedroom.

One of the top floor rooms (in a three floor stone cottage of around 250 years old) is to be Henry's bedroom. It's last paint job however, was completed about 10 years ago when there were no thoughts of kids and Kevin and i were not even married. Hence the terracotta (Kevin calls it orange) colour of the walls!

We decided the room needed to be bright and either blue or green - we decided on green.

Henry was so excited about being involved in the painting of it, i was very impressed.

Dressed in one of my mum's old T shirts he enthusiastically got on with the paint job using a huge roller! Luckily the whole floor was covered in plastic and anything of importance removed from the room.....as Henry and paint get a little messy!

He stuck with it for about 20 minutes before getting bored the first time. We gave him his own wall and told him to paint it however he liked! Lots of crosses, race tracks and faces appeared on the wall which was fun.

Henry returned to paint three times in total over the weekend and was very helpful...i think! He is totally excited about moving into his room, and can claim to have painted it himself...how cool is that!

Friday, July 31, 2009

Outdoor Hour Challege - Ladybugs/Ladybirds


After a couple of weeks off the challenges with our move, we managed to complete on this week - our first in the UK.

This week we tackled Challenge #26 - Ladybugs and aphids.
At this point just let me explain that in the UK we call these little red & black bugs "ladybirds". In an attempt to have Henry speaking English again we used the English terminology for this challenge!!!!!!

Having noticed literally hundreds of lady birds flying around the garden, i looked at the list of challenges and was delighted to find one on ladybirds. However, on the day we did our challenge, the wind was blowing hard and i think we were rather short changed on our bug availability!

However, we went on an explore of my parents gorgeous garden in Suffolk, England. My parents have a great veggie patch, wild blackberries, apple trees and just so many flowers it is amazing. After about 5 minutes; no ladybirds. Armed with a magnifying glass and a pot to put a bug or two into, Henry had been pretty enthusiastic, but that started to dwindle as we found no lady birds. We did however find flies, and huge bumble bees.

Our eagle adult eyes however soon spotted the first lady bird, and after that another 8. I had Henry keep a tally on a piece of paper of every bug we found, then add them up at the end.

We caught a few for closer examination, and also had some crawl onto our arms for fun. Henry overcame his fear and even had one on his arm. Henry had a lot of fun using the magnifying glass when the bugs stayed still long enough.

Back in the house (after about half an hour outside) we journaled our experience. We discussed number of legs, spots, colours, how they moved and where they lived.

Henry drew around a cup and saucer to create the outline of the bug and then painted a great lady bird.

An couple of extra fun activities were:

Finger painting lady birds - where we put splodges of red paint on paper using our fingertips, then when dry we added legs, spots, heads, eyes, antennae etc.

Face painting - I found a face painting kit in a draw never used and Henry agreed to let me turn him into a lady bird - red face with black spots.......in return he painted my face as a tiger!

This challenge was a lot of fun for us.

Thursday, July 30, 2009

Henry goes camping!


So the first night under canvas should ideally be somewhere warm and dry......well tonight we have the dry, so that is what Henry and Kevin are doing. They are camping out in my parents back garden in Suffolk!

It was with much excitement that my small 2 man tent was retrieved from the cupboard, last used 15 years ago, it is in good shape still. Henry helped with putting it up. He loved wielding the long poles around every ones heads, and then hitting my hand as he tried to bang in the pegs. The enthusiasm was impressive though.

After playing in the tent during the day, the idea of a night stop over was put to him. It was met with such excitement we decided it was a "must do" while staying with my parents.

The weather has not been that great, but with a dry night forecast, all hands were on deck to pump up the camp bed and lay out the sleeping bags.

Stories were read by torch light, and Custard tucked up in her own little bed (the little pocket in the wall of the tent lining).

To the sound of the church bells, Henry fell asleep......or did he?

Next day update - Henry was asleep very quickly, daddy took a little longer though! Henry thought the whole experience was a lot of fun and wants to do it again......daddy has suggested mummy spend the night on a hard blow up bed in a tiny tent with Henry who apparently likes to spread out across all but 4" of the bed!!!!