Showing posts with label art and craft. Show all posts

Thursday, April 1, 2010

A recycle robot


I am in the habit of collecting boxes and tubes for some future art project! So we put them to good use building a recycle robot!

I gave Henry all the things he could use on a table. Boxes, toilet rolls, paper plates and a flower pot and some wool and googly eyes! and asked him to design his robot.

Just be aware to have some very strong glue handy if you are going to stick tubes on as legs and arms.

We covered the cereal box body with plain paper so Henry could create whatever design on it he wanted. Henry asked me to help with the arms and legs, but after that he added everything else inc. hair and eyes.

In the end Henry gave the robot a name - "Stanley" and stuck some packing polystyrene bits to its tummy.

Stanley still stands proud in Henry's bedroom, even though we completed this activity months ago.


Tuesday, January 26, 2010

Creating with shapes

With one of Henry's friends coming over to play, I decided to create a little project to keep them both occupied for 10 minutes!

You will need some light weight card or paper of any colour. I had black already, so used this. Next, cut the card into shapes of any type. I tried to cut at least two of everything, so if Henry wanted to he could create a symmetrical piece of art.

You can make the shapes as large or as small as you want. I stuck with squares, rectangles and triangles, but circles and stars would be great too. I supplied a couple of googly eyes as well just for an interesting twist!
Provide your child with the shapes, any little extras such as the googly eyes or stickers, a blank piece of paper and a glue stick and suggest they create.......anything!

Henry started out by creating two trees in pots (symmetrical), using squares for the pots, long rectangles for the trunks and triangles for the tree tops. Then found the googly eyes and got creating a monster! It was great, because as he added shapes he told me what he was doing, its interesting to be in on the thought processes
some times!

We labelled the creation and attached it to the fridge........something so simple, kept two 5 year old boys occupied for about 20 minutes!

Name alien!

I found this great idea on another blog today by Allison McDonald. So simple, but a great idea.

First provide your child with a piece of paper (any colour goes), then ask them to fold in half long ways. This on its own is easier for some children than others.

Next, ask your child to write their name across the width of the paper. Try & encourage writing down to the fold. That way, the resulting alien
shape will be more fun to work with. Big letters are a lot of fun and actually quite challenging when kids have started to write small for school purposes.
When the name is written, draw a line roughly around each
letter so that your child has a guide to follow when they are cutting. Then off they go with the scissors. It really does not matter how neat the cutting is.

Next stage is to open out the paper & turn it over to the blank side....this is where the creating comes in. Supply your child with whatever you think they would like to embellish their alien with! Googly eyes, paints, glitter, feather, pipe cleaners, stickers...whatever works.

Henry had fun with this and requested 6 eyes for his alien...then added some hands, feet and general glittering!


Monday, January 18, 2010

Henry does Hens!


At Christmas we became the proud owners of two brown hens - Henry took delivery of them on Xmas day from Santa! Named Henrietta and Peck Peck, they have become integral members of our family! As I write this blog however, I am recovering from finding one of said hens in the middle of the road near our house after she decided a re enactment of "chicken run" would be fun! Luckily I found her, caught her & delivered her back safely!

With a number of snow days in the last couple of weeks, I dedicated one day to lots
of activities with a "
hen" theme. I'll try & outline them all here, but in summary we had:
  1. Create a piece of hen related art (painting, collage, drawing etc)
  2. Words rhyming with "egg" and "hen" - thought of and written down by Henry.
  3. Read some hen related stories (see another post).
  4. Sight words bingo (with an egg theme)
  5. Simple addition of how many eggs have the two hens layed!
  6. Provide an egg shape and suggest that it be turned into a person/animal etc.
  7. Create a story about Henry and his hens in simple words and read it.
I apologise for the long post, but we did quite a few activities!

1. Hen art
Henry's piece of hen art was a collage using tissue paper cut up and scrunched up. I drew the outline of the Hen, and provided the
squares of cut tissue paper. I did originally offer this in gold, orange and yellow, thinking Henry would use all colours for a multi coloured hen.....however he
stuck with gold and I cut adequate bits for him to finish in that colour. Peck Peck the collage hen was a great success!

2. Rhyming words
On the internet you can find images of
anything you want. A search for "eggs" brought me a great egg picture which I replicated loads of
times. For the rhyming words, Henry had the egg shapes to write each letter on to create the rhyming words.

3. Hen & egg stories
We have on our shelf - Coriander the contrary hen and The most wonderful egg in the world, which we read. We also did an activity with the latter title which I will post as a separate activity.

4. Simple words egg bingo
For Egg bingo I printed a page with 8 eggs on, and onto each of these eggs I wrote one of Henry's sight words. I then printed out a further 8 eggs that I cut out and wrote the same words on. I replicated each of these so I could play with Henry. We took it in turns to take eggs off the pile and read the words then cover the eggs. It was a bit more fun that simple squares with words in.

5.Egg addition eggsercise!
I found a picture of a hen on the internet & printed it out twice. I then printed about 10 eggs out. Under each hen I placed a number of eggs and we did simple addition with Henry recording the number of eggs layed next to a picture of his hen run.


6. Egg head
I provided Henry with a blank piece of paper and a cut out of an egg, and suggested he turn it into a face. I imagined he would add some hair, eyes, nose and mouth......I was wrong - he actually turned it into an egg person! Then when asked to name it...called it Henry Egg!


7. A story about Henry and his hens
This I prepared in advance. I created simple sentences that Henry knew the words or could sound out the words with some help. I then added a few images to help with the story recognition. Henry thought this was great, that he appeared in the story with his hens!

Tuesday, September 29, 2009

Painting without paint or a brush!!!


Outdoor Hour - Challenge #3 - Time to draw

For Henry, who doesn't go a bundle on doing art work, i try to steer away from plain drawing or painting, trying to make the experience a little more unusual if possible.

Most days we get out for a walk with our dog. So for yesterday's walk i took a bag to collect all kinds of things from nature that we might be able to use for an art project.

Henry got very into putting things into the bag...so much so we had an overflowing bag by our return home! During our walk i asked Henry to think of what we could use to draw or paint with, with some help he suggested sticks and feathers. I picked some blackberries and elderberries and got Henry to guess what we might use these for, he was very intrigued by the idea of making paint from them......even more so wh
en i told him we would paint with mud when we got home!

Back home i put all our findings out on a piece of paper and provided a fairly absorbent type of paper for Henry to create his art work on.

To start with i suggested Henry try painting with
mud, He chose a stick and created brown lines all over his page.

Next Henry tried out squashing black berries then rolling them with a stick....beautiful purple designs started to develop. Amazingly, every blackberry had a slightly different colour! Elderberries were squashed and rolled, and finally back to the mud with a rose hip and a feather to create some more brown patterns.

I was totally amazed how well this idea worked. After a good hand wash, the very unusual piece of art has pride of place on our fridge! - whoever said you needed paint and a paintbrush to create a masterpiece!!!

Tuesday, May 19, 2009

Thank you cards

With the end of Henry's first year at school almost upon us, there was a flurry of activity in the last week making cards for friends and teachers.
Despite Henry's insistence at school that art is not for him...he can be very creative when he puts his mind to it.

Early planning and preparation ensured that Henry's teachers cards were created with enthusiasm and no nagging on my part! I suggested he should draw two different flowers and left the rest to him.


He very carefully drew flowers with petals, stems and leaves. Prepared on water colour paper he then got to work painting his masterpieces - each one a complete Henry original.

With the end of school, Henry also prepared good bye cards for his friends.

I wrote each individuals name in oil pastel (white), then suggested he used water colours to find which invisible name of his school friends was written on the card .

We used colour mixing; red and yellow, blue and yellow, and red and blue. And he was intrigued by the way the colours mixed on the card.


13 Henry original note cards...I'm going to use this idea for thank you cards in the future, as i was surprised how great they came out.

Friday, April 24, 2009

Shearing a sheep!


Henry needed a hair cut, so yesterday we finally got around to it! Henry has also fallen in love with this book called "Farmer Brown Shears His Sheep - a yarn about wool", so i figured a way to link the two together for
a project.

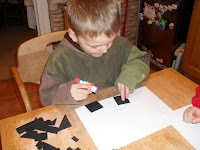
I created cardboard cut outs of two sheep and explained that we were going to give one sheep wool, then give it a hair cut and then
give the other a woolly jumper (as per the story).

Henry got about cutting lengths of wool to attach to the sheep. Then we stuck them on. I made sure the lengths were plenty long enough, so that when we gave the sheep a hair cut there would be enough for the jumper!

We then left that sheep to dry.

It was then time to shear the sheep! Henry loved this bit and gave the sheep a real nice trim!


With all the wool we sheared from the sheep we then got to work dying the wool.

Henry chose purple, so we added a few drops of food colouring to some water and then dunked the wool in a small bowl to dye it. Once coloured we left it to dry for some time. We then came back to the project later.


In the mean time it was Henry's hair cut time.

We discussed that Henry was like the sheep and didn't need all his hair, and that the hair dresser used clippers, just like Farmer Brown!

Hair cut complete, it was now time to give the other sheep
its woolly jumper! So we stuck lots of bits of dyed wool all over the sheep. This time i let Henry stick the wool in whatever direction, and then we filled in the holes.


The end product - a sheep with a purple woolly jumper on!

We read the story again at bed time and discussed the project we had done. It's a great book, rhyming story & really colourful art work.

Farmer Brown Shears his sheep - a yarn about wool. By Teri Sloat. Published by Dorling Kindersly Inc.


Great illustrations in this book which gave me the idea for this project!

Wednesday, April 22, 2009

Earth day art project

The world in my hands........
I searched for Earth Day art projects for pre schoolers on the internet, and from the few ideas i found i created the following project.

You will need:
Blue paper
Paints to create green and brown
Pink paper
Paper to place the project on
Glue
A small photo of your child
Something to paint with - today we went green and used broccoli!!!!

First Henry traced around a baking tin circle to get the earth
shape, which he then cut out.

Next we mixed yellow & blue to create green paint, and the same plus orange to create brown paint - an ideal chance to discuss colour mixing.

We then used broccoli to paint with. Henry loved this idea and was well into it, discussing which countries he was creating - America, UK and New Zealand and who he knows that lives in each. We then let this part of the project dry.

I then traced around his hand, then let him cut them out. I wasn't sure if the hands would have 5 fingers left after he had attacked them with scissors, as this is by far the trickiest thing he has used scissors for. But he figured it out gradually and left both hands intact!

I then cut some pieces of paper for him to write each of the words on. "the world in my hands" and guided his letter formation.

I then took a picture of him and printed it out (at fairly low quality) on my home printer, then put the whole thing together. A great keepsake for the first "earth day" he and i have celebrated.

Saturday, April 18, 2009

Create a machine

This idea is brought to you from Kevin!
Sitting on the sofa on Friday evening, wondering how to entertain Henry on a Saturday morning whilst i was going out, Kevin came up with a great project that Henry found fascinating and a lot of fun.

What you need:
Coloured paper (at least 3 colours)
Scissors & glue
An imagination!

In preparation, Kevin cut out around 20 different shapes that he imagined Henry would identify with as part of a machine - cogs, levers, conveyor belts, switches and funnels, using two different coloured papers to make it more interesting. He then stuck the frame work onto the paper (the box in which he envisaged Henry would make the machine).

With Henry they discussed that they were going to make a machine, what the parts might be that Kevin had prepared and how it might work. after that Henry had a free hand in the design of the machine.

Sticking each piece down individually, Henry came up with a pretty impressive end result....it could possibly even work!

When i got home he took the project off the fridge with great enthusiasm and explained what all the bits did in this "gravity making machine".

Definitely one to be replicated.


Wednesday, April 8, 2009

Easter egg tree

So we are making the most of having Easter as our theme at home this week. Yesterday we made an Easter egg tree. I guess you could make the eggs out of anything to hang on the tree, but the following worked well with Henry.

You will need: card, tissue paper, glue, scissors, twigs, sand and a pot.

I cut out loads of squares
of tissue
paper of different colours. Both Henry & i did a page each (moral support and racing each other seemed to improve Henry's attention span).

We then pasted glue onto the card & got sticking. I totally let him do his own colour choices! A few white spaces are no big deal, but look to try & cover the card, and then paint a layer of glue over the top of all the tissue to secure it down & make it shiny.

It took us about 30 minutes to do the sticking, after which
we took a break to let the glue dry.

Once dry, flip the card over & trace around an egg shape as many times as possible on the page. Henry is just learning letters so i wrote "egg" on the back of the egg. Our eggs were about 3" long.

This was the first time I've ever asked Henry to trace anything other than his hand, it took a few goes, but he quickly got the hang of it.

I let Henry cut out as many eggs as he could, but it was pretty tough for
him with the card & stuff stuck on top. He managed 3 which was more than i expected.

We then paired the eggs up so that when they hung they would look good from any angle. We punched holes near the top of each egg, then threaded cotton through the holes & knotted it. I encouraged Henry to do some threading, and he managed a few eggs, though it was a pretty fiddly process, real fine motor skill development & hand & eye co-ordination.

The most fun bit for Henry - running round the garden to find
twigs for our Easter tree, filling a container with sand from hi
s sand box, then making the tree!

Hanging the eggs was really satisfying after such a long process - kept us occupied for a few hours & the tree looks great in our living room.

Sunday, April 5, 2009

Easter cards


Being easter week, with the family so far away, we got creative with our easter cards. Its fair to say Henry was very proud of these cards he made. He was 100% involved and did everything except fold the cards.


Cutting the body & head of each of the chicks out. - I drew the shapes on light weight card.
We used oil pastels to colour the body parts - Henry loves using two different colours at a time.
Use of the glue bottle - just hand it over and clear up the mess afterwards!
Henry chose the colour of feathers he wanted then stuck them where he wanted. We also added googly eyes and a foam beak...all his choosing as to their location on the body!
Finally drawing on the legs - i showed him how i thought they should look and he was more than happy to try & do it that way.

The finished article ready to make its way through the postal system....lets just hope they don't quarantine easter chicks entering the UK!!!!!!